

TL;DR
- Identify whether the movement is at the cover, mounting base, lever joint or spindle connection.
- Match the installed spindle, retaining parts and fixing pack to the actual handle and door thickness.
- Use the manufacturer’s tightening instructions; extra force is not a substitute for correct engagement.
- Record the symptom and configuration before changing parts, then verify the complete opening after correction.
Quick Answer
When a lever handle is loose after installation, inspect the mounting and spindle connections separately. Record which part moves, whether the latch still retracts and whether the problem changes with the door open or closed. Ask the responsible installer to compare the assembled hardware with its drawing and fixing instructions, including spindle engagement, screw length, retaining components and door preparation. Correct the identified cause using the approved parts and procedure. A lever that droops may require a separate return-mechanism investigation; a moving decorative cover does not by itself prove that the load-bearing mounting is loose.
For an initial configuration review, send clear photographs of both sides and the handle reference to ivan.he@toptekaccess.com. Include the door thickness and a short description of the movement.
Locate the movement before choosing a remedy
Describe the symptom in terms another person can reproduce. Does the complete base move against the door face? Does the lever move outward while the rose remains stationary? Is there rotational free play before the latch starts moving? Does only the decorative cover rotate? These observations narrow the enquiry without assuming that every loose handle has the same cause.
Use a short video and a marked photograph to show the moving interface. Ask the installer to use normal operating effort rather than an improvised pull test. Excessive force can damage a connection and make the original symptom harder to understand. If the handle cannot reliably operate the door, arrange appropriate site control while a competent person assesses it.
Record whether the problem was present at first installation or appeared after use. An immediate problem may relate to the selected parts or assembly. A later complaint may involve wear, loosening, damage or a change in the opening. Timing is evidence to investigate, not proof of a particular cause.
| Observed movement | Information to collect | Review focus |
|---|---|---|
| Base moves against door | Mounting drawing, fasteners and door preparation | Seating and mounting connection |
| Lever slides relative to rose | Spindle reference and retaining components | Lever-to-spindle engagement |
| Free rotation before latch movement | Handle, spindle and lock follower references | Drive interface and component condition |
| Cover moves but base appears stable | Cover attachment method | Decorative cover retention |
| Lever does not return | Return mechanism and lock behaviour | Separate return or binding investigation |
Separate mounting fixings from lever retention
The fasteners securing the mounting assembly to the door do a different job from the part retaining the lever on its spindle. Tightening one connection will not necessarily correct movement at the other. Identify both connections in the supplied drawing before anyone removes a cover or adjusts a screw.
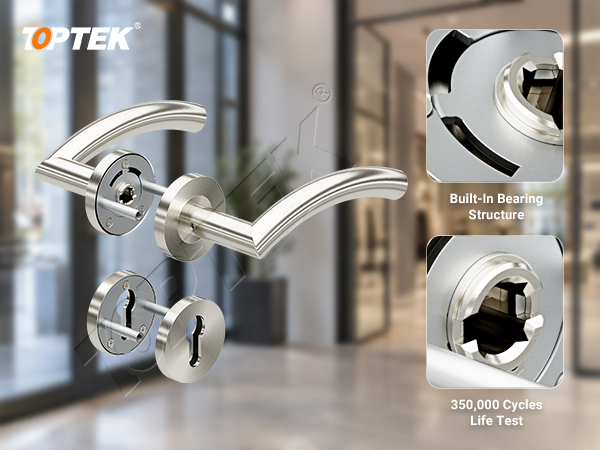
TOPTEK’s handle installation illustration in its 2026 catalogue shows a spindle, cover plates, mounting bases, a metal frame, through-bolt screws and grub screws as separate parts. That illustration provides a useful component checklist. The actual order must still identify the relevant handle version and its approved assembly instructions.
Compare the physical assembly with the drawing. Check that required components are present and correctly seated, that the chosen fasteners belong to the specified mounting arrangement, and that covers are attached by their intended method. Do not assume a fastener from a similar-looking handle has the same thread or engagement geometry.
Check spindle engagement and door thickness together
A spindle must work with the handle joints, the lock follower and the assembled door thickness. Door thickness alone is not the complete stack: mounting bases, plates and other components also affect how the assembly fits. A spindle that appears to pass through the lock may still have unsuitable engagement at one handle.
Provide the supplier with the spindle drawing or reference, not just a photograph of a square bar. Record its length, section and any features intended to locate retaining parts. Ask the supplier to confirm the required engagement for the proposed hardware combination. There is no single engagement value that can safely be transferred to every lever design.
The commercial lever handle specification guide explains the broader lock, spindle and door interface. For a loose-handle complaint, connect those specification details to the observed movement: which side moves, when it moves and whether the drive to the latch remains consistent.
Inspect seating and preparation without masking damage
A mounting base needs the intended support from the prepared door. An uneven surface, unsuitable opening or damaged fixing location can prevent correct seating. The installer should compare preparation with the approved template and inspect the receiving material. A cover plate can hide a preparation problem without correcting it.
On a hollow or reinforced door, identify what receives the fixing. On a timber door, identify the approved fixing method and the condition of the prepared locations. Avoid treating a screw that continues to turn as a sign that it merely needs more tightening. The connection may require a different assessment.
Do not introduce adhesive, improvised packing or different fasteners to conceal recurring movement without approval. These changes can alter alignment, serviceability and the documented assembly. If the opening has fire, security or escape requirements, refer changes to the responsible door and hardware suppliers before proceeding.

Use the correct tightening procedure
Ask for the tightening sequence, tools and any specified torque for the exact product. A generic instruction to tighten everything harder can create a second fault. Uneven seating or unsuitable screw length can remain even when the installer feels strong resistance at the tool.
Manufacturer instructions demonstrate why the details matter. HOPPE’s HLS 9000 stainless steel handle instructions distinguish underplate fastening from handle set-screw installation and give product-specific requirements. Those requirements belong to that assembly. Obtain TOPTEK’s applicable instructions rather than transferring another manufacturer’s torque or threadlocker recommendation.
After an approved correction, check normal handle movement and latch operation before returning the opening to service. If tightening improves retention but makes operation stiff, record both outcomes and investigate the assembly. Retention and free operation must be achieved together.
Build a useful fault report and verification record
Provide opening identification, handle and lock references, door thickness, installation date, fixing-pack reference and photographs. Include the frequency of the symptom and whether it affects one side or both. Keep a removed component identified with its opening instead of mixing it with unrelated spare parts.
Separate a suspected product issue from installation evidence. A supplier needs enough detail to compare the parts supplied with the parts fitted. For several affected doors, list the combinations and batches involved. A consistent pattern across one door type may be more informative than a general statement that all handles feel loose.
Agree what the correction must demonstrate: stable mounting under normal use, reliable lever retention, intended return behaviour and consistent latch operation. Record the parts changed and the instructions followed. If the same fault recurs, the earlier record allows the investigation to continue from evidence rather than restart with another tightening attempt.
RFQ checklist and TOPTEK product support
The TOPTEK lever handle range and the EUG4001 product reference provide starting points for discussing the actual hardware. A product family label is insufficient to identify all service components. Confirm the exact configuration before ordering a replacement set or fixing pack.
- Identify the handle, mounting base, spindle and lock references.
- Give the finished door thickness and relevant preparation drawing.
- Describe the moving interface and supply a short operating video.
- State whether the fault existed at installation or developed later.
- List parts adjusted or substituted and any observed damage.
- Request the correct fixing pack, instructions and acceptance checks.
- State quantities, opening requirements and the evidence needed for approval.
Why TOPTEK? Its catalogue presents the handle assembly as an identifiable set of components, while its quality management information provides a basis for discussing drawing checks and inspection records. Ask for evidence tied to the supplied configuration. General durability or product-family statements cannot diagnose a particular loose connection.
For a formal quotation, submit the confirmed configuration and fault record to the TOPTEK commercial door hardware team. Ask the proposal to distinguish replacement components, installation requirements and any preparation changes.
Frequently asked questions
Does a loose lever always mean a broken return spring?
No. Movement can occur at the mounting base, lever joint, spindle connection or cover. Identify the moving interface before investigating the return mechanism.
Can a longer spindle solve the problem?
Only if the approved assembly requires it. Confirm the spindle specification and engagement at both handles; an unsuitable longer spindle can introduce other fitting problems.
Should the installer apply threadlocker?
Use it only where the applicable manufacturer instructions specify or permit it. Confirm the product, location and procedure for the actual assembly.
What should a supplier receive with a loose-handle enquiry?
Send handle and lock references, door thickness, fixing details, photographs, a short operating video and a record of earlier adjustments.
Can a moving rose cover be ignored?
Identify whether only the cover moves or the mounting assembly also moves. Confirm the intended cover attachment and correct any fault using the approved method.
Conclusion
A loose lever handle after installation is best resolved by locating the moving connection, checking the matched components and following the correct assembly procedure. A clear fault record helps the buyer obtain the right parts and gives the installer a defined result to verify.